The i-Pilot system is a advanced navigation and control solution designed for trolling motors, offering precise boat control and enhanced fishing experiences through GPS and wireless remote functionality.
1.1 Overview of the i-Pilot Remote Control
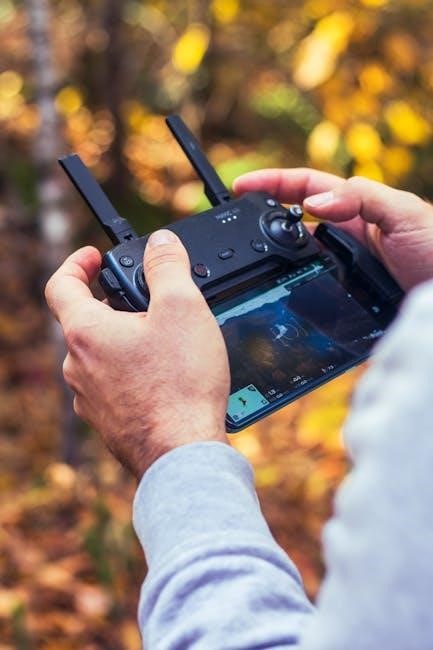
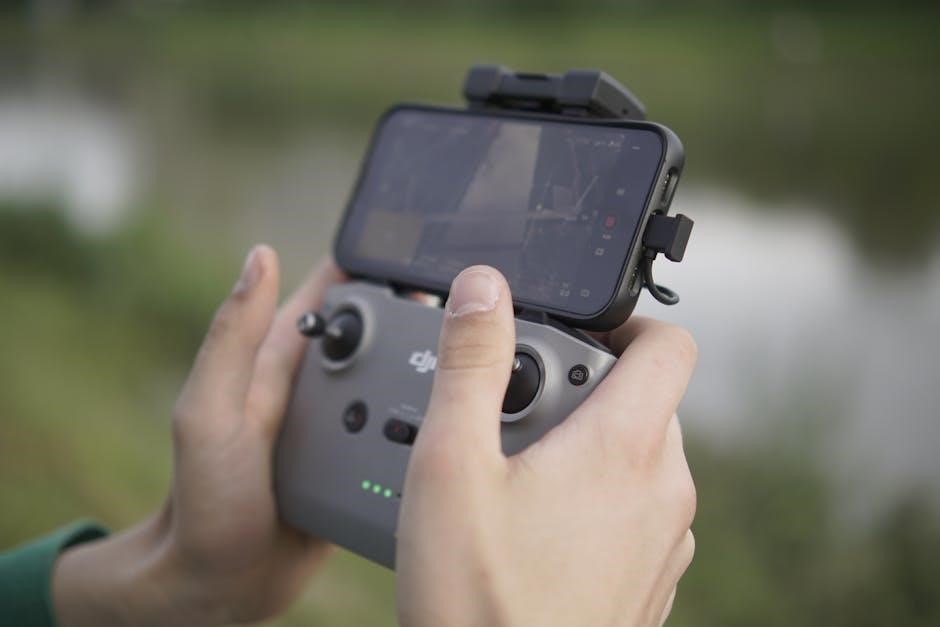
The i-Pilot remote control is a wireless device designed to operate Minn Kota trolling motors, offering features like Spot-Lock, Cruise Control, and AutoPilot. It provides precise boat control, GPS navigation, and customizable settings. The remote communicates with the motor’s control head, allowing users to manage speed, direction, and waypoints effortlessly. Its intuitive design enhances fishing experiences by simplifying boat positioning and navigation tasks.
1.2 Importance of the i-Pilot System in Boating
The i-Pilot system revolutionizes boating by providing precise control and navigation, enhancing fishing experiences through features like Spot-Lock and AutoPilot. It improves safety, reduces manual effort, and optimizes battery usage, making it indispensable for anglers and boaters seeking efficiency and reliability on the water.
Components of the i-Pilot Remote Control
The i-Pilot remote features a control head, LCD display, navigation buttons, and manual control buttons, with a battery compartment for power management and wireless connectivity.
2.1 Key Features of the Remote Control
The i-Pilot remote includes Spot-Lock, Cruise Control, and AutoPilot functionalities, along with a backlit LCD display for visibility. It features waterproof design, manual propulsion speed control, and GPS navigation capabilities. The remote also includes a battery status indicator and compatibility with Bluetooth or radio frequency communication for reliable connectivity to the trolling motor system.
2.2 Accessories and Additional Equipment
The i-Pilot remote control system includes essential accessories like a cradle and mounting hardware for secure placement. Additional equipment such as extended antennas and battery kits enhance functionality. A quick reference guide and detailed user manual are provided for easy setup and troubleshooting, ensuring optimal performance and user satisfaction.
Installation and Setup
Installation involves mounting the control head and connecting the remote to the trolling motor. Follow the manual for proper setup to ensure system integration and function.
3.1 Mounting the Control Head
Mount the control head securely on your boat’s dashboard or console. Ensure it is within easy reach and visibility. Use the provided screws and brackets for installation. Align the control head level and tighten firmly. Avoid obstructing the GPS signal or display visibility. Refer to the manual for specific mounting instructions and tools required. Proper installation ensures reliable performance and safe operation. Follow all safety guidelines provided.
3.2 Connecting the Remote to the Trolling Motor
To connect the remote, ensure the trolling motor is powered on. Press and hold the pairing button on the motor’s control head until a tone sounds. On the remote, navigate to the pairing menu and confirm the connection. Verify the remote’s display shows the motor’s status. Ensure both devices are properly synced for seamless communication and control. Follow manual instructions for specific pairing steps.
3.3 Initial Setup and Configuration
After installation, power on the trolling motor and remote. Ensure the motor’s control head is set to remote mode. Check for a confirmation tone and stable GPS signal. Calibrate the heading sensor by following on-screen prompts. Review and adjust settings like prop speed and Autopilot sensitivity. Save preferences to customize your boating experience. Refer to the manual for detailed calibration steps.
Pairing the Remote with the Controller
Pairing ensures seamless communication between the i-Pilot remote and the trolling motor. Press and hold the Pair button on the motor’s control head until a tone sounds. This initiates the pairing process, syncing the remote for reliable operation. Ensure both devices are powered on and within range during pairing.
4.1 Steps to Pair the Remote
To pair the i-Pilot remote, ensure the trolling motor is powered on. Locate the Pair button on the motor’s control head and press and hold it until a tone is heard. This indicates the motor is in pairing mode. Within 30 seconds, turn the remote on and press the Pair button on the remote until it also emits a tone. Once paired successfully, the remote will communicate with the motor seamlessly, allowing full control of the boat’s movements and functions. This process ensures a secure connection and optimal performance during navigation. Proper pairing is essential for reliable operation.
4.2 Troubleshooting Pairing Issues
If pairing fails, ensure the remote batteries are fully charged or replaced. Verify the trolling motor is powered on and in pairing mode. Retry the pairing process by pressing the Pair button on both the remote and control head simultaneously. If issues persist, check for signal interference or obstructions. Consult the user manual or contact support for further assistance to resolve connectivity problems effectively.
Using the i-Pilot Remote Features
The i-Pilot remote offers advanced features like Spot-Lock, Cruise Control, and AutoPilot, enabling precise boat control and navigation. These functions enhance fishing experiences by allowing hands-free operation and accurate positioning, ensuring a seamless and efficient boating experience with minimal manual intervention required.
5.1 Spot-Lock Functionality
The Spot-Lock feature allows the boat to hold its position using GPS, making it ideal for fishing or maintaining a specific location. Pressing the Spot-Lock button on the remote saves the current location, and the system automatically adjusts the motor to stay on target. This hands-free functionality enhances precision and convenience, enabling anglers to focus on fishing while the boat remains stationary. The remote display confirms the temporary anchor point, ensuring accuracy and ease of use.
5.2 Cruise Control and AutoPilot
The Cruise Control feature maintains a consistent boat speed, ideal for trolling or traveling long distances. AutoPilot enables hands-free steering, automatically adjusting the trolling motor’s direction. Using GPS, the system tracks and follows waypoints or headings, ensuring precise navigation. The remote displays speed and direction, allowing real-time adjustments. This combination enhances boating efficiency and reduces manual effort, providing a seamless experience for anglers and boaters alike.
5.3 Recording and Navigating to Waypoints
The i-Pilot remote allows users to record and navigate to waypoints using GPS technology. Pressing the Spot-Lock button saves the current location, while the remote’s navigation buttons enable return to saved waypoints. The display shows coordinates and status, ensuring precise revisits to fishing spots or desired destinations. This feature enhances navigation efficiency and accuracy for anglers and boaters alike.
Manual Control Buttons
The manual control buttons on the i-Pilot remote enable precise control of prop speed and directional movement. These buttons provide quick access to essential functions for immediate adjustments while boating.
6.1 Prop Speed Control
The i-Pilot remote’s prop speed control allows users to adjust the trolling motor’s speed precisely. Buttons labeled with numbers or symbols enable quick selection of desired speed settings. This feature is particularly useful for maintaining consistent movement in various fishing conditions or environmental factors like wind and currents, ensuring optimal control during fishing trips.
6.2 Directional and Steering Controls
The i-Pilot remote features directional buttons for precise boat movement, including left, right, forward, and reverse controls. A steering toggle allows for smooth adjustments in direction. These controls work seamlessly with the trolling motor to provide accurate navigation, enabling anglers to position their boat effectively in various fishing scenarios.

Navigation and GPS Features
The i-Pilot system integrates GPS technology for precise navigation, enabling waypoint tracking, spot-lock positioning, and accurate boat control, enhancing fishing and boating experiences with advanced location management.
7.1 Understanding GPS Signal Strength
The i-Pilot system relies on GPS signal strength for accurate navigation. A strong signal ensures precise location tracking and reliable feature operation. Signal strength can be affected by environmental factors like surrounding structures or satellite clarity. The remote display indicates signal quality, helping users assess connectivity. Maintaining a clear view of the sky and avoiding obstructions improves signal reception, ensuring optimal performance of GPS-dependent features like Spot-Lock and waypoint navigation.
7.2 Using the Remote for Navigation
The i-Pilot remote offers intuitive navigation controls, enabling precise boat positioning and route tracking. Users can set waypoints, record paths, and utilize Spot-Lock to maintain position. The remote’s GPS functionality provides real-time data on location and direction, ensuring accurate navigation. This feature is particularly useful for fishermen, allowing them to mark productive fishing spots and return effortlessly, enhancing efficiency and overall boating experience.
Display and Status Indicators
The i-Pilot remote’s display shows GPS signal strength, battery levels, and motor status. Status indicators alert users to issues, aiding in system monitoring and troubleshooting.
8.1 Understanding the Remote Display
The i-Pilot remote’s LCD display provides essential information such as GPS signal strength, battery levels, and motor status. Icons and numerical data indicate system activity, helping users monitor boat speed and navigation. The display also shows error codes and status updates, ensuring users can quickly identify and address issues. Regular updates keep the system running smoothly.
8.2 Monitoring Motor and Battery Status
The i-Pilot remote provides real-time motor and battery status updates. The display shows battery level indicators and motor performance metrics, allowing users to monitor energy usage and system health. This feature helps prevent unexpected shutdowns and ensures optimal boat control. Regular monitoring enables timely maintenance and extends the life of both the motor and battery.
Calibrating the Heading Sensor
Calibrate the heading sensor by turning on the system, holding the remote steady, and pressing specific buttons. Follow on-screen instructions for accurate alignment and confirmation signals.
9.1 Steps to Calibrate the Sensor
- Turn on the i-Pilot system and ensure the remote is paired to the controller.
- Hold the remote steady and press the calibration button as instructed.
- Slowly move the boat in a straight line for 30 seconds to complete alignment.
- Wait for confirmation signals or messages on the display.
Calibration ensures accurate heading and navigation performance. Follow these steps carefully for optimal system functionality.
9.2 Troubleshooting Calibration Issues
- If calibration fails, restart the system and retry.
- Ensure the boat is stationary and away from interference.
- Check battery levels and connections for the remote and motor.
- If issues persist, reset the system to factory settings.
These steps help resolve common calibration problems, ensuring accurate sensor performance.
Maintenance and Care
Regularly clean the remote with a soft cloth and avoid exposure to harsh chemicals. Protect it from water and extreme temperatures to ensure longevity.
10.1 Cleaning and Protecting the Remote
Use a soft, dry cloth to wipe the remote, avoiding harsh chemicals or abrasive materials. Inspect for damage regularly and store in a protective case when not in use. For stubborn marks, dampen the cloth slightly but ensure no moisture enters the device. Avoid exposure to extreme temperatures or direct sunlight to maintain functionality and longevity.
10.2 Battery Maintenance Tips
Use high-quality alkaline batteries for optimal performance. Avoid mixing old and new batteries or different types. Clean terminals regularly with a soft cloth to prevent corrosion. Store batteries in a cool, dry place when not in use. Replace batteries annually or when voltage drops below 1.0V. Ensure proper installation to maintain reliable remote functionality and prevent signal issues.
Troubleshooting Common Issues
Common issues include connectivity problems and unresponsive remotes. Check battery health, ensure proper pairing, and verify all connections. Resetting the system often resolves these problems quickly.
11;1 Remote Not Responding
If the i-Pilot remote fails to respond, first check the battery level and ensure it’s properly connected. Restart the system by turning it off and on. Verify the remote is paired correctly with the controller. If issues persist, reset the remote by removing and reinserting the battery or performing a factory reset as detailed in the manual;
11.2 GPS Signal Loss and Recovery
GPS signal loss may occur due to poor satellite reception or voltage drops. Ensure all connections are secure and batteries are charged. Restart the system by turning it off and on. If issues persist, recalibrate the heading sensor or check for interference from other electronic devices. Consult the manual for detailed troubleshooting steps to restore GPS functionality effectively.
Technical Specifications and Compatibility
The i-Pilot remote is compatible with Bluetooth-enabled systems and operates on AAA batteries, ensuring reliable performance with Minn Kota trolling motors like Terrova, up to 30 feet range.
12.1 Compatibility with Trolling Motors
The i-Pilot remote is designed to work seamlessly with Minn Kota trolling motors, including models like Terrova and PowerDrive. It ensures precise control and integrates with advanced features like Spot-Lock and AutoPilot. Compatibility extends across various motor configurations, providing reliable performance and enhanced boating experiences for anglers and enthusiasts alike.
12.2 Technical Details and Requirements
The i-Pilot remote operates on Bluetooth technology, ensuring reliable wireless communication with compatible trolling motors. It requires AAA batteries for power and features a waterproof design for durability. The system supports GPS navigation and integrates seamlessly with Minn Kota motors, offering precise control and advanced functionality for optimal boating experiences.
The i-Pilot system enhances boating experiences with advanced GPS features and intuitive remote control, offering unparalleled convenience and precision for anglers and boaters alike.
13.1 Summary of Key Features and Benefits
The i-Pilot system offers advanced GPS navigation, Spot-Lock precision anchoring, and seamless remote control for trolling motors. Its intuitive design enhances fishing experiences by allowing precise boat positioning and speed control. Key features include waypoint navigation, cruise control, and real-time status monitoring. These benefits make the i-Pilot an essential tool for anglers and boaters seeking efficiency and accuracy on the water.
13.2 Final Thoughts and Recommendations
The i-Pilot system is a must-have for modern boating, offering unparalleled control and convenience. Regular maintenance, such as battery checks and software updates, ensures optimal performance. For troubleshooting, resetting the remote or recalibrating the heading sensor often resolves issues. Overall, the i-Pilot enhances fishing and navigation experiences, making it a valuable investment for any serious angler or boater.